Angular 6+ inside Adobe Experience Manager
Developers always like to work with the newest technologies but sometimes it is difficult to integrate this inside a product you are working with. I had this experience with Angular 2+ and Adobe Experience Manager (AEM).
But with the release of Angular 6 they implemented a nice way to convert Angular components into a custom HTML element. With this new power it is pretty straight forward to implement Angular components into AEM. In this blog post I will take you through the steps that are needed to implement Angular in an AEM codebase.
I have created a Github codebase and tagged all the steps to follow along. I generated a default AEM project with the AEM Maven 11 archetype and added a new maven module called front-end which contains our angular weather component we want to integrate into AEM. To get this code use the tag: ‘0-setup’.

One thing that we notice in this setup is the path to the assets. In our angular application, we mimic the path where it will be on the AEM side. In this case I have chosen to upload my assets to /etc/designs/ngx/assets.
Now that we have setup our angular app you can run it by executing the following commands:
cd front-end
ng serve
1. Exposing our component as a custom element
The first thing we need to do is expose our weather component as a custom element. To start we need to execute the following commands to get the libraries we need:
ng add @angular/elements
npm install @webcomponents/custom-elements --save
npm install document-register-element@1.8.1 --save
The first library will add the angular functionality to create custom elements, second library will add polyfills for the browsers that currently do not support custom elements. Document-register-element is a stand-alone lightweight version of Custom Elements V1 based on top, and compatible with, the battle-tested Custom Elements V0.
There is currently a bug in angular elements that it breaks if we try to use a higher version of document-register-element, but in the future, you should be able to use the latest versions.
Next up we need to register the WeatherComponent as an entryComponent and add the following code to the class AppModule:
constructor(private injector: Injector) {}

ngDoBootstrap() {
  const weatherElement = createCustomElement(WeatherComponent,{
    injector: this.injector
  });

  customElements.define('weather-ng', <any>weatherElement);
}
In this code snippet we inject the angular Injector into our AppModule instance and register a lifecycle hook that will be called when angular is bootstrapping: ngDoBootstrap(). The method createCustomElement is part of the @angular/elements library. This method will basically create the correct code to be a custom element. After that follows customElements.define where we define what tag this custom element will have in this case it is weather-ng. The customElements object is available in all major browsers or through the polyfills.
When you have done this, you can remove the bootstrap part of your module config and in your index.html use the tag weather-ng.
Tag for the code: 1-exposing-the-component
2. Building and creating a clientlib
The next step is building our components and creating a clientlib from the exported files. I as well integrated the maven front-end plugin so we can use maven like the rest of the modules.
First we need to add the following to the scripts part of the package.json.
"build:elements": "ng build --prod --output-hashing none && node elements-build.js" This npm script has two parts, the first part will build the Angular components production ready and with no output hashing. After that we use node.js to execute a javascript file. This file is the glue between Angular and AEM. The following code snipped it the elements-build.js file:
const fs = require('fs-extra');
const concat = require('concat');
(async function build() {
  const files = [
    './dist/front-end/runtime.js',
    './dist/front-end/polyfills.js',
    './dist/front-end/scripts.js',
    './dist/front-end/main.js'
  ];

  const rootDir = '../ui.apps/src/main/content/jcr_root/etc/designs/ngx'

  await fs.ensureDir(`${rootDir}/clientlib-site/js`);
  await fs.ensureDir(`${rootDir}/clientlib-site/css`);

  await concat(files, `${rootDir}/clientlib-site/js/ng-aem.js`);
  await fs.copyFile('./dist/front-end/styles.css', `${rootDir}/clientlib-site/css/ng-aem.css`);

  await fs.copy('./dist/front-end/etc/designs/ngx/assets/', `${rootDir}/assets`);
  await fs.copy('./dist/front-end/weathericons-regular-webfont.eot', `${rootDir}/clientlib-site/css/weathericons-regular-webfont.eot`);
  await fs.copy('./dist/front-end/weathericons-regular-webfont.svg', `${rootDir}/clientlib-site/css/weathericons-regular-webfont.svg`);
  await fs.copy('./dist/front-end/weathericons-regular-webfont.ttf', `${rootDir}/clientlib-site/css/weathericons-regular-webfont.ttf`);
  await fs.copy('./dist/front-end/weathericons-regular-webfont.woff', `${rootDir}/clientlib-site/css/weathericons-regular-webfont.woff`);

  await appendDataIfNotExists(`${rootDir}/clientlib-site/js.txt`, 'ng-aem.js');
  await appendDataIfNotExists(`${rootDir}/clientlib-site/css.txt`, 'ng-aem.css');

  console.log("Done with moving angular libs to AEM");
})();

async function appendDataIfNotExists(file, toAppend) {
  const data = await fs.readFile(file, 'utf8');
  if (!data.split('\n').find((val) => val === toAppend)) {
    await fs.writeFile(file,  data + '\n' + toAppend);
  }
}
Let’s list up what this file does in bullet points:
- It checks if the correct folders exists with: fs.ensureDir()
- It concatenates all angular javascript files from the build and saves them at the clientlib position
- It copies the css file to the clientlib position
- It copies the assets to the correct directory
- It copies the weather icons font to the css clientlib position
- It checks and adds if the clientlib files are added to the js.txt and css.txt
- The last thing it does is log a message that we moved the angular files to AEM
The last thing to setup to make this process more complete is that we run this script when we run mvn install. To do this we use the front-end plugin and add the following configuration to the pom.xml of the front-end module:
<build>
    <plugins>
      <plugin>
        <groupId>com.github.eirslett</groupId>
        <artifactId>frontend-maven-plugin</artifactId>
        <version>1.6</version>
        <configuration>
          <nodeVersion>v10.4.1</nodeVersion>
        </configuration>
        <executions>
          <execution>
            <id>install node and npm</id>
            <goals>
              <goal>install-node-and-npm</goal>
            </goals>
            <phase>generate-resources</phase>
          </execution>
          <execution>
            <id>npm install</id>
            <goals>
              <goal>npm</goal>
            </goals>
            <phase>generate-resources</phase>
            <configuration>
              <arguments>install</arguments>
            </configuration>
          </execution>
          <execution>
            <id>npm run build custom elements</id>
            <goals>
              <goal>npm</goal>
            </goals>
            <phase>generate-resources</phase>
            <configuration>
              <arguments>run build:elements</arguments>
            </configuration>
          </execution>
       </executions>
     </plugin>
  </plugins>
</build>
This configuration allows you when we use mvn install to download node.js and execute the npm install command, when this is done it will run the build:elements script.
Tag for the code: 2-building
3. Creating the AEM component
When we are done building our Angular component we can create an AEM component with it. The weather component in AEM will have a dialog with a selectbox where you can select ‘Kelvin’, ‘Celsius’ or ‘Farenheit’ to display in the weather component. We will as well make it that we can drag and drop other AEM components within our Angular component.
First we create the WeatherModel sling model in the package com.did.core.models with the following code:
@Model(adaptables=Resource.class)
public class WeatherModel {

    @Inject
    @Named("unitType")
    @Default(values="")
    private String unitType;

    public String getUnitType() {
        return unitType;
    }
    public void setUnitType(String unitType) {
        this.unitType = unitType;
    }
}
The next code snippet is the selectbox part from the dialog:
<unitType jcr:primaryType="nt:unstructured" sling:resourceType="granite/ui/components/foundation/form/select" fieldLabel="Link Color" name="./unitType">
  <items jcr:primaryType="nt:unstructured">
    <default jcr:primaryType="nt:unstructured" text="Kelvin" value=""/>
    <metric jcr:primaryType="nt:unstructured" text="Celcius" value="metric"/>
    <imperial jcr:primaryType="nt:unstructured" text="Farenheit" value="imperial"/>
  </items>
</unitType>
The last code snippet is from weather-ng.html and renders the component in author and publish mode:
<div data-sly-test="${wcmmode.edit}">
    <h3>Drag here the components you want to display in your weather component</h3>
    <div data-sly-resource="${'content' @ resourceType='wcm/foundation/components/parsys'}"></div>
</div>

<weather-ng data-sly-test="${wcmmode.disabled}" data-sly-use.weather="com.did.core.models.WeatherModel" unit="${weather.unitType}">
    <div data-sly-resource="${'content' @  resourceType='wcm/foundation/components/parsys'}"></div>
</weather-ng>
In the HTML we have two parts, the first part is when we are on an Author environment. We do not show our angular component here, but we do offer the option to add components to the page within our weather component.
The second part is only shown when wcm mode is disabled, here you can see our custom element working. The Angular input in the weather component is now an attribute on the element, so we use this to pass the AEM Component config to our Angular component.
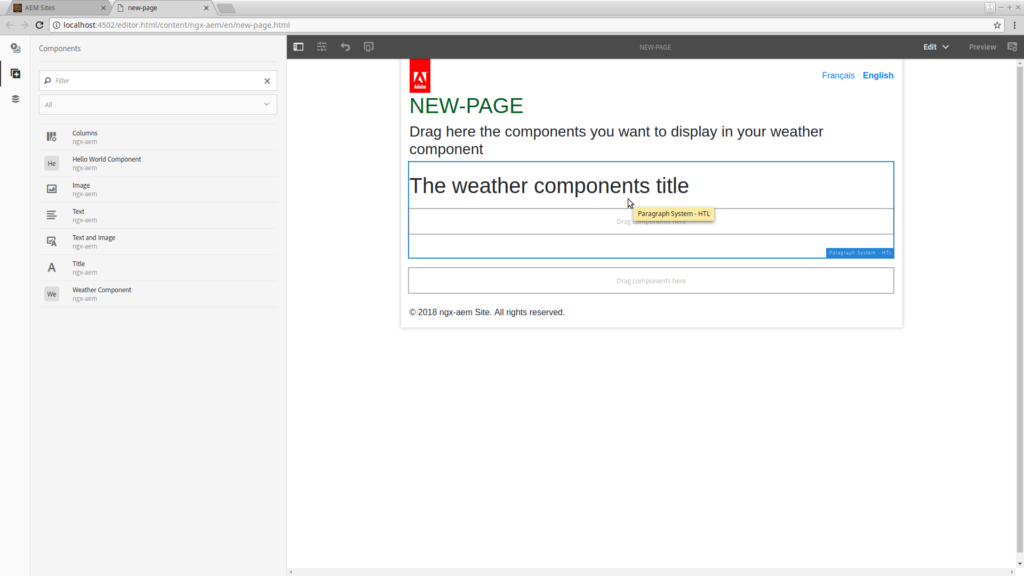
This is the Author view, you can see on the left that we have our Weather Component. In the middle, you can see that we can drag components onto the weather component.
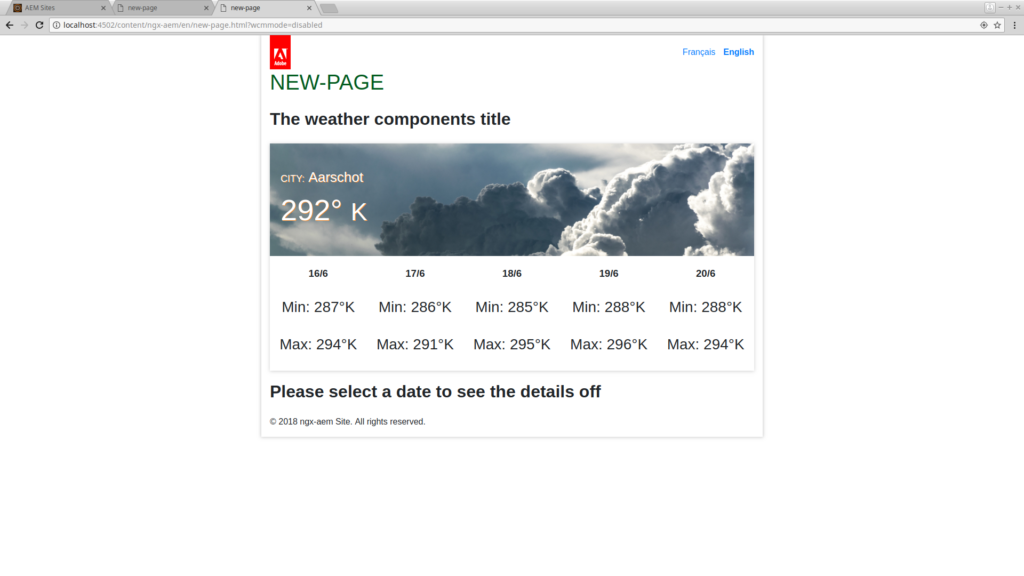
Here we can see the Angular component rendered as it will on a publish environment.
Tag for the code: 3-integrating
Conclusion
So, we now took an existing weather app written in Angular 6 and made it a component of AEM with minimal effort. Time to draw my conclusion of integration Angular 6+ into AEM.
I think that it is a success, you can have all the nice features of Angular 6+ and AEM altogether. I mainly liked that I could develop without spinning up my AEM instance unit all the front-end code was done. Through the power of custom elements, it integrates rather easy with AEM. The size of our clientlib is reasonable as well with 268,8 KB which can be made smaller by using the GZIP feature of AEM clientlibs.
In the future, I will for sure use Angular 6+ again for more complex components in AEM.